what kind of cable does dish network use,cross connect ethernet cable
Understanding the Types of Cable Used by Dish Network
When it comes to setting up a satellite television service like Dish Network, understanding the types of cables used is crucial for ensuring optimal performance and connectivity. One of the primary cables utilized in Dish Network installations is the coaxial cable. Coaxial cables are specifically designed to carry high-frequency electrical signals, making them ideal for transmitting the signals necessary for satellite TV reception. These cables consist of a copper conductor surrounded by insulation, a metallic shield, and an outer insulating layer. This construction helps to minimize signal interference and maintain signal integrity over long distances.
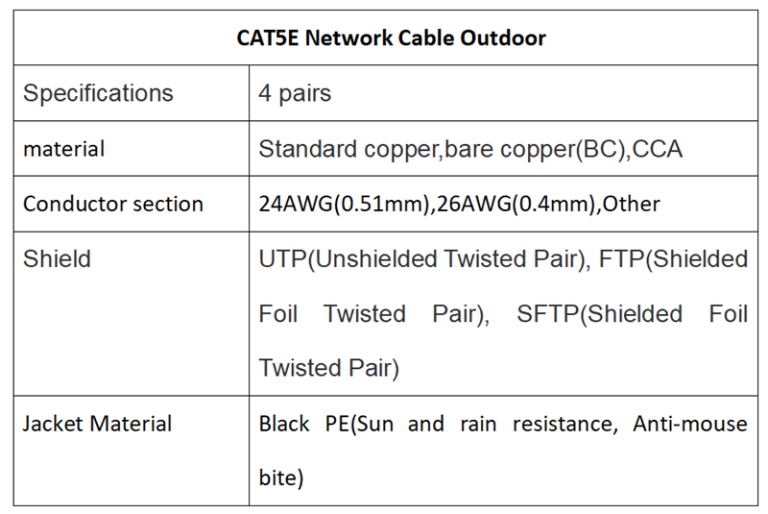
In addition to coaxial cables, Dish Network installations may also require the use of Ethernet cables for connecting various devices, such as receivers, modems, and routers. Ethernet cables are commonly used for networking purposes and come in different categories, each offering varying levels of performance and bandwidth. The most commonly used Ethernet cable for residential installations is Category 5e (Cat5e) or Category 6 (Cat6) cable. These cables are capable of supporting high-speed internet connections and are suitable for streaming video content and accessing online services through Dish Network receivers.
When it comes to connecting devices within a home network, Ethernet cables are often preferred over wireless connections due to their reliability and stability. Ethernet cables provide a direct, wired connection between devices, which can result in faster data transfer speeds and lower latency compared to wireless connections. This is particularly important for streaming high-definition content and gaming, where a stable internet connection is essential for a seamless viewing or gaming experience.
In some cases, Dish Network installations may also involve the use of fiber optic cables for transmitting data over long distances. Fiber optic cables utilize light signals to transmit data, offering higher bandwidth and greater transmission speeds compared to traditional copper cables. While fiber optic cables are not commonly used within residential settings for Dish Network installations, they are often employed in larger commercial or multi-dwelling unit installations where long-distance transmission is required.
Understanding the types of cables used by Dish Network is essential for ensuring a successful installation and optimal performance of your satellite TV service. Coaxial cables are used to transmit the satellite signal from the satellite dish to the receiver, while Ethernet cables provide connectivity between devices within your home network. By selecting the appropriate cables and ensuring proper installation, you can enjoy a reliable and high-quality viewing experience with your Dish Network service.
In conclusion, Dish Network installations utilize a combination of coaxial, Ethernet, and in some cases, fiber optic cables to transmit signals and provide connectivity between devices. Coaxial cables are used for satellite signal transmission, while Ethernet cables are employed for networking purposes within the home. Understanding the differences between these cable types and selecting the appropriate cables for your installation can help ensure a smooth and reliable satellite TV experience with Dish Network.
How to Properly Cross-Connect Ethernet Cables
Ethernet cables are the backbone of modern networking, facilitating the transmission of data between devices within a network. Whether you’re setting up a home network or configuring a large-scale corporate infrastructure, understanding how to properly cross-connect Ethernet cables is essential for ensuring efficient and reliable communication. In this article, we’ll delve into the intricacies of Ethernet cable connections, focusing on the types of cables used and the best practices for cross-connecting them.
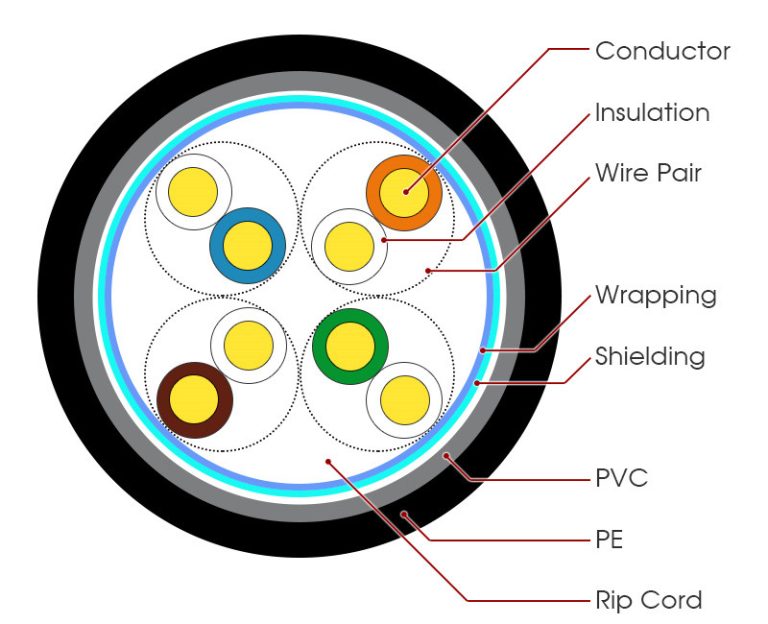
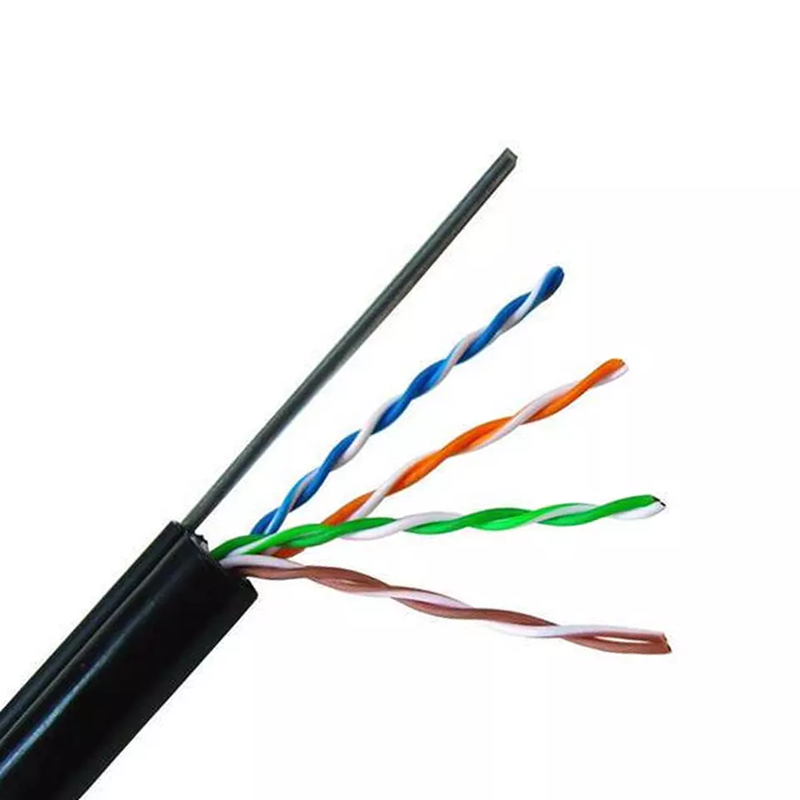
Before delving into cross-connecting Ethernet cables, it’s crucial to understand the types of cables commonly used in networking. The most prevalent type is the twisted pair cable, which consists of multiple pairs of insulated copper wires twisted together to minimize electromagnetic interference. Within the realm of twisted pair cables, two main categories exist: unshielded twisted pair (UTP) and shielded twisted pair (STP). UTP cables are more common and cost-effective, while STP cables offer additional protection against electromagnetic interference.
When it comes to cross-connecting Ethernet cables, the process involves interconnecting cables to establish communication between different network devices, such as computers, routers, and switches. This is typically achieved using patch panels, which serve as central distribution points for Ethernet connections. Patch panels feature multiple ports on the front and rear, allowing cables to be terminated and cross-connected in an organized manner.
To properly cross-connect Ethernet cables using a patch panel, follow these steps:
1. **Preparation:** Begin by gathering the necessary materials, including Ethernet cables, a patch panel, and appropriate tools such as a cable cutter/stripper and a punch-down tool.
2. **Cable Termination:** Trim and strip the ends of the Ethernet cables to expose the internal wires. Ensure that each wire is properly aligned and untangled to facilitate a clean connection.
3. **Patch Panel Installation:** Mount the patch panel onto a suitable surface, ensuring that it is securely fastened and easily accessible for cable termination.
4. **Cable Routing:** Carefully route the Ethernet cables from their respective devices to the patch panel, ensuring that there is sufficient slack for termination and future adjustments.
5. **Termination:** Insert each stripped Ethernet cable into the corresponding port on the patch panel. Use a punch-down tool to securely terminate the wires onto the panel’s IDC (insulation displacement connection) terminals, ensuring proper contact and conductivity.
6. **Labeling:** Label each terminated cable and corresponding port on the patch panel to facilitate easy identification and troubleshooting in the future.
7. **Testing:** Once all cables are cross-connected, conduct thorough testing to verify proper connectivity and data transmission between network devices. Use appropriate network testing tools to check for continuity, signal strength, and potential issues such as crosstalk or interference.
By following these steps, you can ensure that your Ethernet cables are properly cross-connected, providing a reliable and efficient networking infrastructure. Proper cable management and labeling are essential for maintaining order and facilitating future maintenance and upgrades. Additionally, regular testing and monitoring help identify and address any issues promptly, ensuring uninterrupted network performance.
In conclusion, understanding how to properly cross-connect Ethernet cables is essential for building and maintaining robust network infrastructures. By following best practices and utilizing appropriate tools and techniques, you can establish reliable communication between network devices, enabling seamless data transmission and connectivity.
| Number | Name |
| 1 | Large Electrical Telephone Logarithmic Cable |